
Safety Tips When Wiring For Outlets
Adding an outlet to an existing wall is a common home wiring project. However, any work involving the main service panel requires skill and knowledge of safety practices.
Wire connections to an electrical box should be made using pigtails, short lengths of NM wire that you twist together with a pair of lineman pliers. This keeps the splice from being exposed and creating a potential fire hazard.
Wire Lengths
If you're wiring an outlet for a new circuit, it's important to use the proper wire gauge to match its amperage capacity. Using the right size of wire can help prevent heat build-up, which is a fire hazard. The wires must be properly connected to the appropriate terminals in order to prevent electrical arcing. An incorrectly sized wire can also cause the circuit breaker to trip when you turn on an appliance. Determining the correct size of wire can be easy when you know what factors to look for.
Residential electrical wire, commonly referred to as Romex(r), comes in a variety of gauges for different load capacities. The number on the packaging indicates the wire's gauge, such as 12-2 or 12-3. Each gauge is intended for a specific circuit amperage rating. For example, 14-gauge wire should be used for outlets connected to a 15-amp circuit and 10-gauge wire for 20-amp breaker circuits.
To determine a wire's gauge, remove the insulation and examine its diameter and number of wire turns per inch. If you have a wire stripper, use the tool to cut off about 3 inches of the end of the wire. This will reveal the metal wire inside. A wire with a copper jacket will have a higher gauge than an aluminum one.
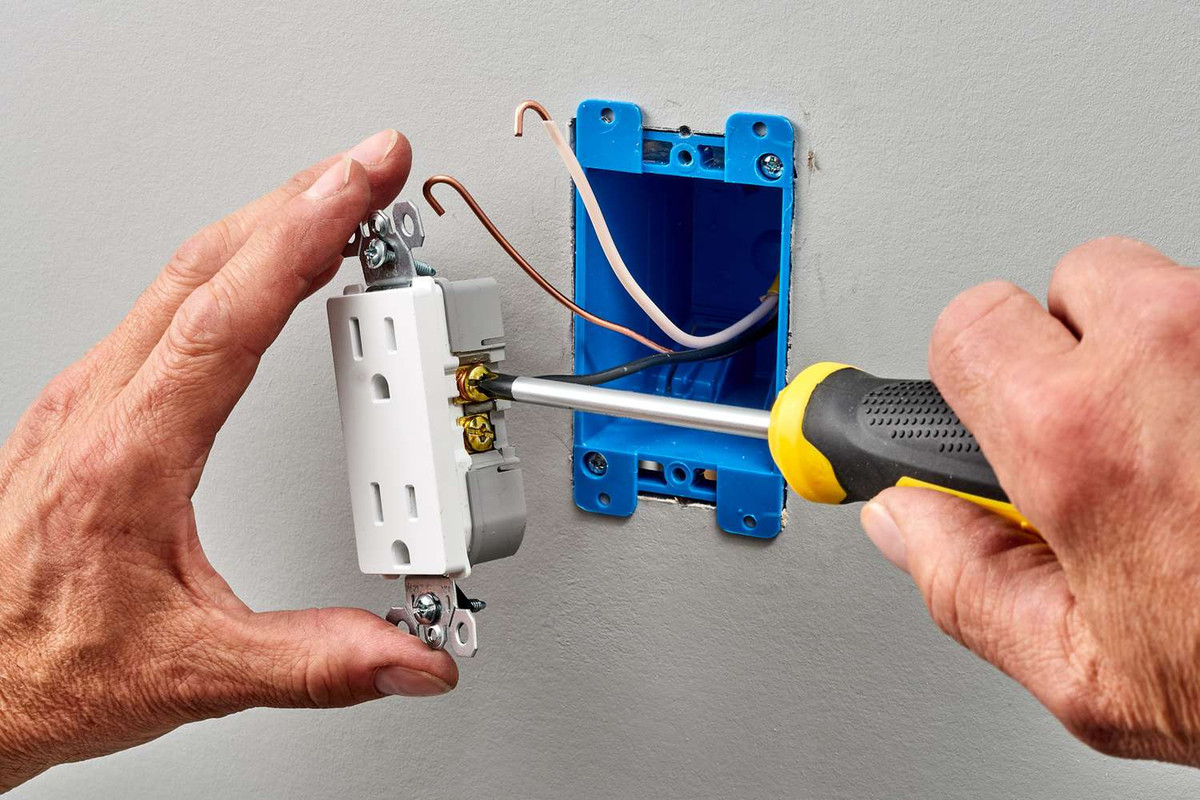
Wires should be trimmed to approximately 6 inches in length before splicing. This will give you plenty of length to connect the wires to their appropriate terminals in the receptacle. The ground wire should be stripped and trimmed to about 3 inches in length, as well. You can then form it into a hook to connect it to the ground screw on the receptacle.
Inspectors from Electrician Pasadena will check the wire connections in your receptacles for safety. They will also inspect the cable anchoring to ensure that it's secure in wall studs. The first staple should be no further than 8 inches from the box and then every 4 feet thereafter. This helps to keep nails and screws from penetrating the cables during construction. In addition, the receptacle's back terminals should be firmly clamped down in order to ensure that they won't come loose during normal use.
Wire Terminations
When wiring an outlet or switching outlets, you'll need to make connections to electrical wires. These are called "terminations." The standard way of doing this is by screwing the bare wire ends into terminal screws on the receptacle or switch. But this method is not as secure as using a crimp-type termination.
First, locate your home's main electrical panel (breaker box) and shut off the circuit powering the new receptacle. Be sure to use a voltage tester or another outlet that you know works to double-check that the power is off.
Next, remove the faceplate from the receptacle to expose the screw terminals underneath. If the receptacle has grounding, you'll also need to disconnect the ground wire from its screw terminal. Form a J-shaped hook on the end of each wire (or pigtail) using needle-nose pliers, and then fit it into the grounding screw on the new receptacle. Close the hook around the screw, then tighten the screw. If you are using a push-in fitting with screw clamps to tighten the wires, be careful not to overtighten them. This can loosen the connection and possibly lead to a spark that could cause an electric fire.
If the receptacle is not being switched, it's best to avoid connecting the wires leading to downstream outlets with these terminals and instead connect them with wire connectors. This makes future reconnections easier and creates a more stable connection.
If you are switching the receptacle, be sure to connect the black wires to each other and to the switch's terminal. This carries the source electricity from the breaker panel to the switch and then on to the switched outlets. The white wires, on the other hand, carry the current from the switches to the receptacles and then back to the switches and the source. The unused, green or bare copper wire is the ground. It's important to connect it to the green grounding screw or to a grounded box. The grounding is what protects you from fatal electric shocks. For added safety, always wear rubber gloves when working with electricity.
Wire Splices
When you are working with electrical wires, it's important to make sure that all connections are secure. Loose wires are a fire and shock hazard. When adding an outlet or modifying one, you may need to splice wires together. Splicing is a way to combine two lengths of wire so they can carry electricity, but you must be careful to use the correct tools and techniques.
Before you splice any wires, be sure the power is turned off. You should also wear rubber gloves and goggles to protect yourself from cuts and splinters. Use a wire stripper to remove the insulation on both ends of each wire, then twist them together tightly. Use a wire nut to provide a tight seal and prevent moisture from entering the splice. When the splice is finished, cover it with electrical tape or shrink tubes.
The National Electrical Code (NEC) requires that every splice in an electrical circuit be made inside of a junction box. This will ensure that the splice can be accessed and repaired, should it need to be in the future. It's also a good idea to use a junction box whenever you are installing or modifying a light fixture, outlet, or other electrical device.
In some situations, it is necessary to make a wire splice without accessing the junction box. These situations should be rare, but it is possible. For instance, you might need to extend a wire that runs behind a wall for some reason. If this is the case, the 2005 and 2008 editions of the NEC give you permission to splice in this situation. However, you must still follow the other Code requirements for splicing in wall spaces.
If you are working on an older home, you might be tempted to splice the wires in the walls using a twist-on wire knot or a butt splice. These methods are not recommended, as they are not UL-approved and can lose their integrity over time. Electrician Pasadena electrician can perform wire splicing that meets the NEC's requirements. This will keep you and your family safe from fires and shocks.
Wire Connectors
Wire connectors are essential electrical fasteners that help you join (splice) wire conductors when wiring switches, outlets and lighting fixtures. But if you use the wrong kind of connector, or do it incorrectly, you can create an open circuit that will expose live wires to their surroundings and could potentially start an electrical fire. This is why it is important to know the basics of electrical wiring and how to use wire connectors correctly when rewiring an outlet.
There are a few different types of wire connectors available, and each has its own advantages and disadvantages. Typically, electricians use push-in connectors to make their connections because they offer reliable and consistent connections, but do-it-yourselfers and novices often prefer twist-on connectors since they are easier to work with.
Both types of connectors have a metal spring that helps to bridge the conductors together. When twisted on, they tighten down around the spliced wires to hold them in place and prevent accidental disconnections or shorting. However, it is important to note that splicing wires without the proper connectors can be dangerous and should only be done by a qualified professional.
When using a twist-on type of connector, bare copper wire conductor ends are inserted into the connector and then the conical spring is tightened by hand until it snaps over each end of the bare conductors to secure them in place. Premium connectors may also have tabs or wings that enable them to be tightened with a specialized wrench instead of by hand.
To install a new outlet, first make sure that all electrical current is shut off at your home’s circuit breaker panel. You will also need to cut a hole in the wall at each location where you intend to place an outlet. Ensure that the holes are in studs, and that they are about 18” from each other.
Next, use a drill to drill holes in the studs for the new outlet boxes. When the holes are finished, you can feed the 14-gauge Romex(r) cable into them. When installing the receptacle, attach the grounding wire by connecting it to the green screw terminal on the receptacle using a properly sized pigtail wire. The white neutral wire or pigtail should be connected to the silver screw terminal and the black hot wire or pigtail should be attached to the brass screw terminal.
Adding an outlet to an existing wall is a common home wiring project. However, any work involving the main service panel requires skill and knowledge of safety practices. Wire connections to an electrical box should be made using pigtails, short lengths of NM wire that you twist together with a pair of lineman pliers. This…